|
BRICKS and BRICK MAKING
HOME | A-Z INDEX | MEMBERS | MPS | OFFICERS HOME | AFFORDABLE | CLIMATE | DEVELOPERS | ECONOMY | FLOOD | HISTORY | HOMES LADDER | MORALS | POVERTY | PROPERTY | SLAVERY | TAXES | SLUMS | VALUATIONS | WEALTH
|
||||||||||||||||||
|
There are five steps needed to make bricks:-
STEP 1 - is called WINNING, or mining the clay.
Because
the steam shovel was not invented until 1879 early brickmakers had to
dig for the clay on site with hand shovels. This was done in autumn. The
early brickmaker chose his clay by it's color and texture and based on
his experience. He sought clay that was located just under the topsoil
to minimize the hard work of digging it with hand spades. The clay was
exposed to the weather so that the freeze-thaw cycle of the winter could
break the clay down and allow it to be worked by hand. The winter made
the clay soft and removed unwanted oxides.
STEP 2 - PREPARATION of the clay

In the spring the clay was then able to be worked by hand. It was necessary to either grind the clay into a powder and screen it to remove stones or the clay was was placed into a soaking pit where it was mixed with water to obtain the right consistency for moulding. It was kneaded with the hands and feet to mix all the elements of the clay together. This step was called tempering or pugging and was the hardest work of all. In the mid-1800's horse driven pug mills were invented. (below)
The
clay was removed from the soaking pit or pug mill by a temperer who
delivered it to the moulding table.
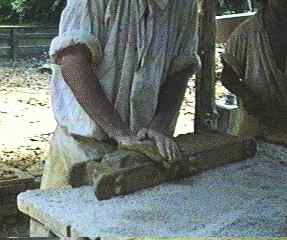
STEP 3 - MOULDING.
The assistant brick mouder was called the "clot" moulder and he would prepare a lump of clay and give it to the brick moulder. The brickmoulder was the key to the operation and he was the head of the team. He would stand at the moulding table for twelve to fourteen hours a day and with the help of his assistants could make 3500 to 5000 bricks in a day. He would take the clot of clay, roll it in sand and "dash" it into the sanded mould. The clay was pressed into the mould with the hands and the excess clay removed from the top of the mould with a strike, which was a flat stick that had been soaking in water. This excess clay was returned to the clot moulder to be reformed . Sand was used to prevent the clay from sticking to the mould.
STEP 4 - DRYING
The moulded bricks were stacked in a herring bone pattern to dry in the air and the sun. The moulded bricks were first left to dry for two days at which time they were turned over to facilitate uniform drying and prevent warping. During this time tools called dressers or clappers were used by "edgers" to to straighten the bricks and obtain a smooth surface. After four days of dry hot weather the bricks were sufficiently hard to allow them to be stacked on end in a herringbone pattern with a finger's width between them to allow futher drying. This area was called a hack or a hackstead and the bricks were covered under roof or with straw to protect them from the rain or harsh sun. After two weeks the bricks were ready to be burned.
STEP 4 - DRYING
If fired bricks were on hand they were used to construct the outer walls of the kiln and the surface was daubed with mud to contain the heat. If no fired bricks were availible the kiln was constructed entirely of green or raw bricks which were stacked in such a way as to act as their own kiln. These kilns were called clamps or scove kilns. Wood and coal were used for fuel.
Even after drying in air the green bricks contained 9-15% water. For this reason the fires were kept low for 24-48 hours to finish the drying process and during this time steam could be seen coming from the top of the kiln. This was called "water smoke". Once the gases cleared this was the sign to increase the intensity of the fires. If it was done too soon the steam created in the bricks would cause them to explode. Intense fires were maintained in the fire holes around the clock for a week until temperatures of 1800 degrees F were reached. The knowledge and experience of the brickmaker dictated when the fireholes would be bricked over and the heat was allowed to slowly dissipate over another week.
When the kiln was disassembled the sorting process began. If only raw bricks were used, the bricks from the outermost walls were kept to be burned again in the next kiln. Some bricks which were closest to the fire recieved a natural wood ash glaze from the sand that fell into the fires and became vaporized and deposited on the bricks. These bricks were used in the interior courses of the walls. Bricks that became severely over burned and cracked or warped were called clinkers and were occasionally used for garden walls or garden paths.
The best bricks were chosen for use on the exterior walls of the building. Those that were only slightly underfired had a salmon color and early bricklayers knew that the porosity of these bricks would help to insulate the structure and they were placed on the innermost courses of the wall.
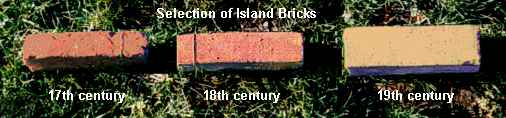
DATING BRICKS
Bricks
which form all or part of a building may have their date fixed by the
history of the building. Loose bricks with a maker's mark in the frog
can often be dated if the brickmaker is identified. Bricks without
these guides are difficult to date with any precision. With a few
exceptions, raw materials and firing temperatures have remained the
much same for hundreds of years. What pointers there are merely typify
a particular period, rather than confirm it.
Bonds
were selected for reasons of aesthetics, strength or economy. English
was one of the first to be used and was common throughout the 16th and
17th centuries. Flemish became popular in the 18th century
particularly when used as a design feature with alternate coloured
bricks. Rat trap is not a strong bond but fewer bricks went
further and its use may have been encouraged by the 18th century brick
tax.
USING BRICKS
Once you have made your bricks, you will find that sand and cement mixed with water will bond the bricks together to build a wall. It is usual to build a wall on a solid base called a foundation, that is concrete poured over hard-core to form a footing. A footing being a firm lock into the earth or clay that you are intend building on.
Concrete rafts are also used instead of deeper footings, typically reinforced with steel. The end result is the same, a firm base on which to build a wall made of bricks.
LOCAL GOVERNMENT CORRUPTION
It is essential to provide housing at affordable prices for every person in the United Kingdom. At present houses are kept artificially high. For this reason life is harder for young couples starting out.
Part of the reason houses are so expensive, is that the planning officers employed by town councils are not accountable to the ratepayer. MANY ARE ON THE TAKE and in property themselves. In addition, councillors are usually retired or well off, or perhaps do not need to work.
Instead of worrying about providing housing for the man in the street, they simply want to make their plot worth more. It stands to reason. If you had the chance to make your porperty worth more, what would you do? Whatever the reason, councillors do not argue against some planning applications, but will argue against other identical proposals. The opposite is also true. Some planning applications are approved before they hit the committee room. While other applications more in line with good planning policy, get a rough ride - delays - questions and requests for more details.
It really all depends on who is making the application. If you are not on the list of friends and associates, you stand much less of a chance of obtaining planning permission.
THIS SITE CONTAINS MANY EXAMPLES OF COUNCIL'S UNREASONABLE BEHAVIOUR - With thanks to Action Groups across the country for the supply of real case history and supporting documents. *THAT THE PUBLIC MAY KNOW*
|
||||||||||||||||||
|
This site is free of © Copyright except where specifically stated. Any person may download, use and quote any reference or any link, and is guaranteed such right to freedom of information and speech under the Human Rights and Freedom of Information Acts. However, be aware that we cannot be held liable for the accuracy of the information provided. All users should therefore research matters for themselves and seek their own legal advice and this information is provided simply by way of a guide. Horse Sanctuary UK Limited.
|
||||||||||||||||||